

How To Play A Animation From Click Unity
Allow's see how to use gratis resource from Adobe Mixamo and Unity's Animators to animate a bones player character!
🚀Find all of my Unity tutorials on Github!
This article is also available on Medium.
This tutorial is available either in video format or in text format – see beneath 🙂
Become the scripts and assets for this tutorial on my Github 🙂
A quick overview
In this episode, we're going to program a very unproblematic player controller that can be idle, run around left and right or jump, "side-scroller" style.
To practise this, nosotros will utilise costless animations from Adobe Mixamo, and Unity Animators and Rigidbodies – our move volition therefore be based on physics.
Are you gear up? Then, allow'due south dive in!
What is Mixamo?
The showtime footstep is to get some animations from Adobe Mixamo.
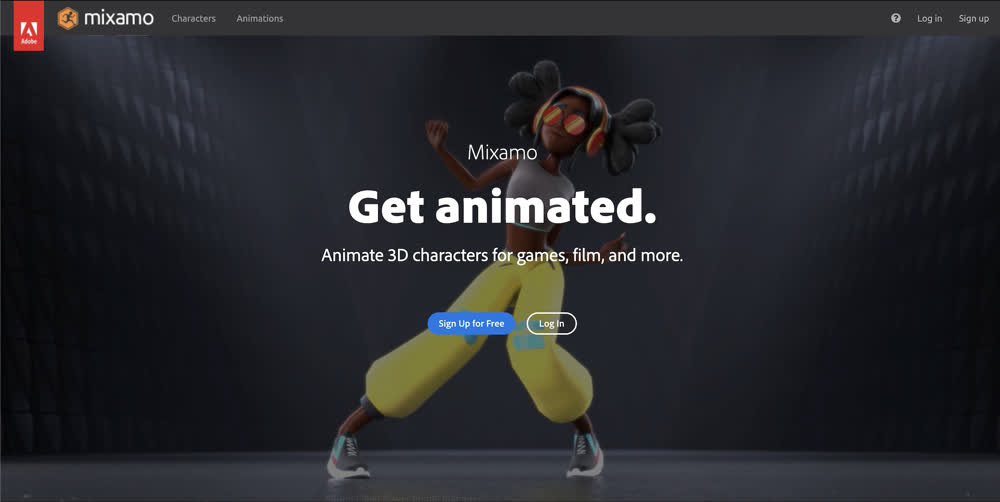
Mixamo is an online platform where you lot tin can download rigged characters, poses and animations for free! And then even if you lot don't have your ain 3D model, you lot can easily download any blitheness with i of the born avatars, like this cherry-red one I'll utilize hither. The lib is pretty comprehensive – it has a lot of various actions and movements, with a focus on video games projects. Just browse the listing and you'll find animations of a biped standing, walking, running, jumping or attacking.
Note: from what I've seen, information technology doesn't have animals and quadrupeds yet…
In our case, nosotros desire to brand a basic hero using this red 10-Bot model.
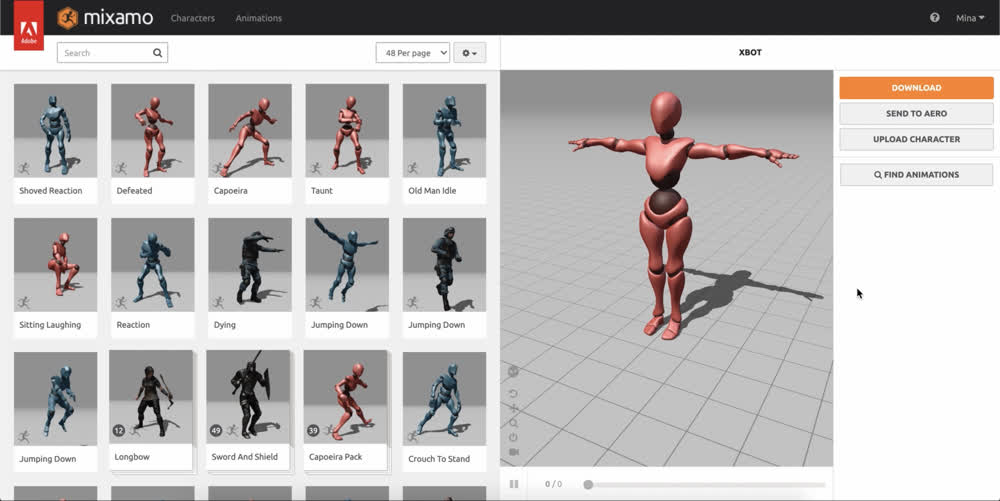
So, first, to be able to download resources from the website, make sure you are logged in with either a Mixamo business relationship or other usual providers like Google. Once you are signed in, you'll go access to all the resources and you'll be able to scan or directly search for something.
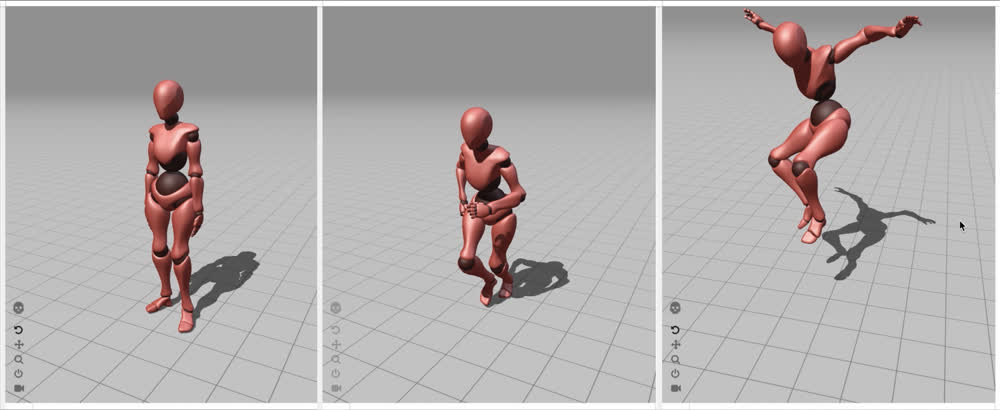
Here, I'll go ahead and download 3 animations: an idle stance, a run blitheness and finally a spring animation.
Considering all models are rigged with the aforementioned standard, y'all can apply any animation on your current model – you don't need to stick with the ones that prove this specific model in the preview!
Also, subsequently you've picked an blitheness, you tin click and drag the 3D view on the right to orbit around the model, and you can zoom in and out.
Some animations also motion the root of the model because they imply some larger movements. If yous don't desire this overall translation, you lot can check the "In Identify" box on the right to constrain the animation to only the non-root bones.
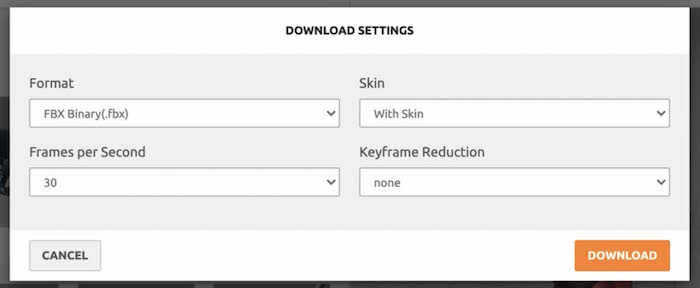
So – for each of these animations, I tin can simply click the "Download" button and go along the default export options. I want to use Mixamo's avatar in Unity, which means I have to make sure I do export the blitheness "with the skin". You lot can also select various FBX formats if you want, but the default is fine for Unity.
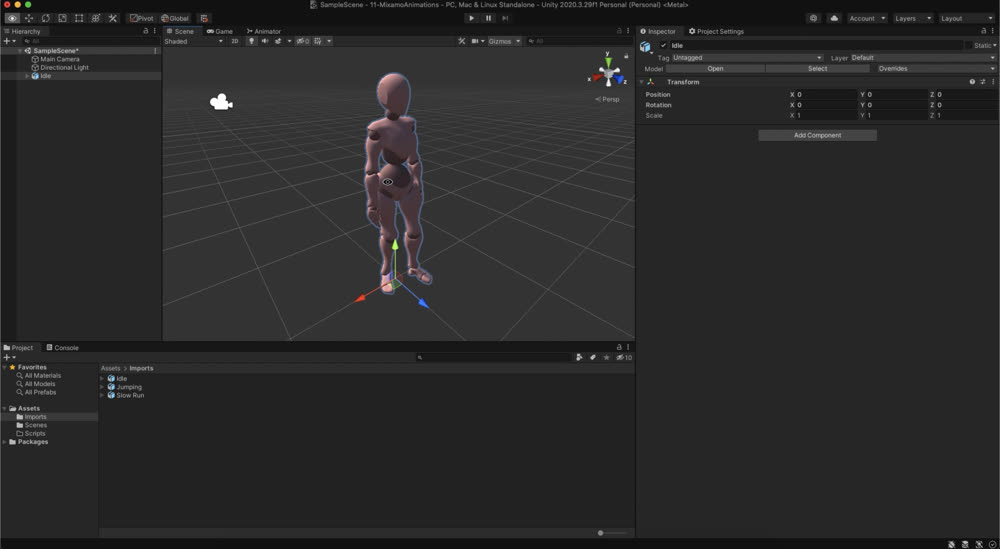
Ok: now, I take 3 FBX files on my reckoner. To import them in my Unity project, I can just drag them anywhere in the "Assets" binder or a subdirectory.
And then, we tin easily drag any of our three assets in an empty scene and we directly get our nice 10-Bot! 🙂
Updating the import settings
But we need to setup some import settings for these FBX files and then that Unity can properly extract all the required data from them because, at the moment, it'south not possible to play any of our animations.
When you select one of the Mixamo imported asset, you'll see that the Inspector opens a special import window with iv tabs: "Model", "Rig", "Animation" and "Materials". This is the FBX importer window.
Model
The first tab is for choosing specific subparts to exclude from the import, or to convert betwixt various ground past changing the axes or the units.
Here, we only need to alter one thing, that is to bake the axes, because Mixamo models are designed with game engines like Unity in mind, so they're configured to match most of the defaults.

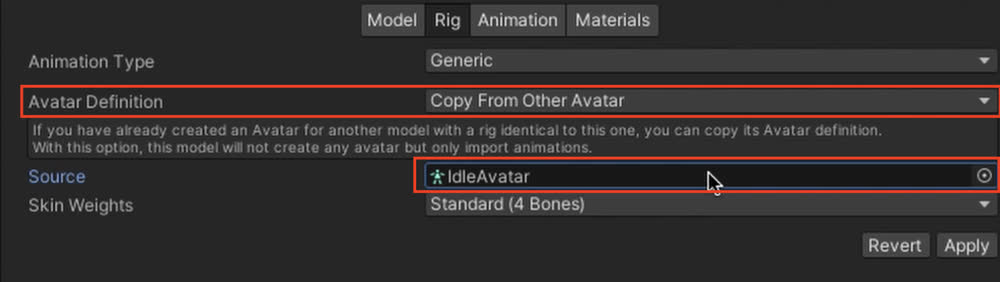
Rig
In the second tab, we demand to change the import parameters to create an avatar for our mode50. And then, in the "Avatar Definition" dropdown, select the "Create From This Model" option.
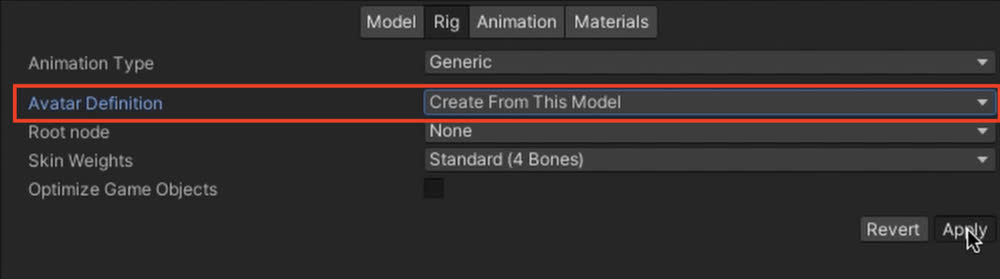
The thought is that in Unity, the animation of a humanoid character relies on the definition of an avatar: this nugget is used to lucifer the bones in your character's skeleton with the animation keys and curves. As explained in the docs, you demand to "reconcile the bone structure of the Model to its Blitheness", so you basically need to do a re-mapping of the bones stored in your FBX file with in a Unity humanoid avatar.
Important notation: one time yous've changed the settings, don't forget to striking "Apply" at the bottom to actually keep those settings! 😉
Animation
In the third tab, nosotros can preview the animation on our model and cheque its settings. The import is fine overall, although nosotros can rename the clip to requite it a more meaningful name and nosotros need to make certain that the "Idle" and "Run" animations loop by checking the "Loop Fourth dimension" option.
Again, call up to apply the settings at the bottom!

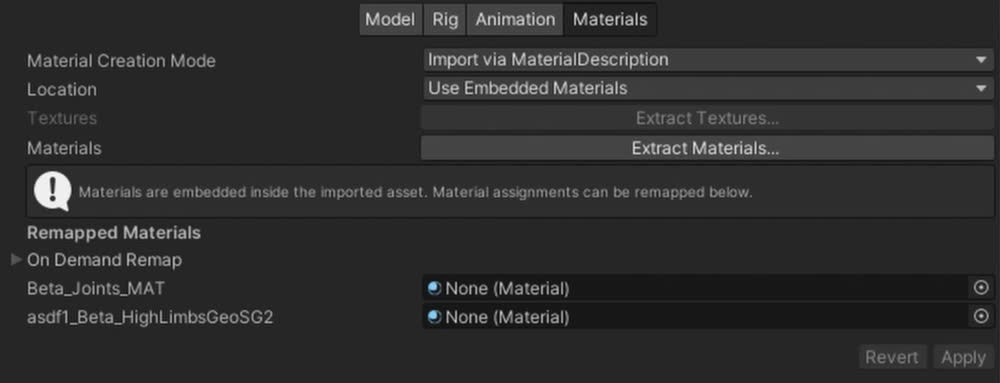
Materials
Finally, the "Materials" tab lets united states choose how we desire the materials to be assigned on our model. For now, they are automatically created and loaded from the FBX file: yous tin can find them inside your imported asset, as sub-avails. But if you want, y'all can also replace them with your own Unity materials. Here, I'll only stick with the default config.
Tip: re-using our avatar
Don't forget to apply the aforementioned settings on your ii other Mixamo assets! For the other rigs, however, we don't need to create new avatars; instead, we can simply copy the first one nosotros created by passing in the avatar sub-asset in this slot.
Configuring the Animator with an Animator Controller
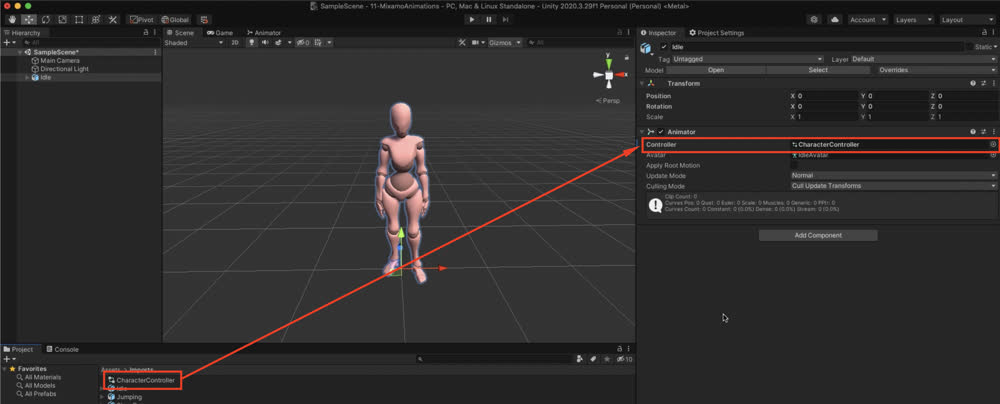
Ok, at that signal, our 10-Bot is ready to be scripted and animated! And so, first, let's set all the different animations it will use, along with some useful parameters, thanks to Unity's Animator component.
This component allows Unity to utilise a specific animation to your model, using its avatar. And if you accept a look at your instantiated Mixamo asset, you can see 1 was automatically added to information technology. That happened when we updated our "Rig" config and asked to create an avatar from this model.
Merely if we want to control which animation the Animator uses, nosotros demand to create another asset: an Animator Controller.
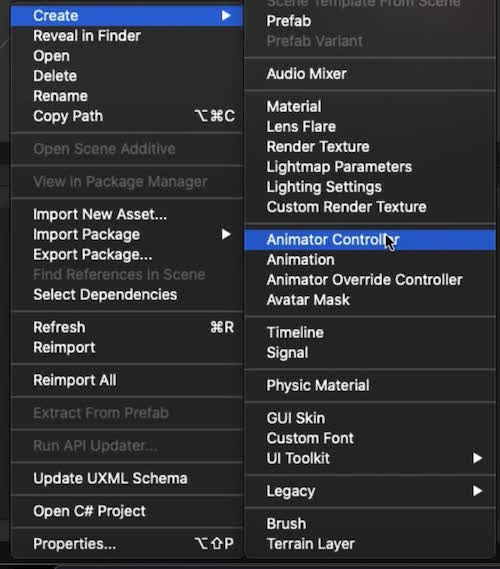
Basically, this component lets you conform and link various animations together using a state automobile. Each Animation Clip is referenced by Unity as a land, and you can then design sort of a period-chart with the unlike Animation Transition from ane clip to another.
To link the new Animator Controller to the Animator, simply drag it into the dedicated spot in the Inspector.
At present, we need to open up the Animator window to inspect this Animator Controller more closely. To do this, just go to the menu bar, then Window, and then Blitheness and Animator.

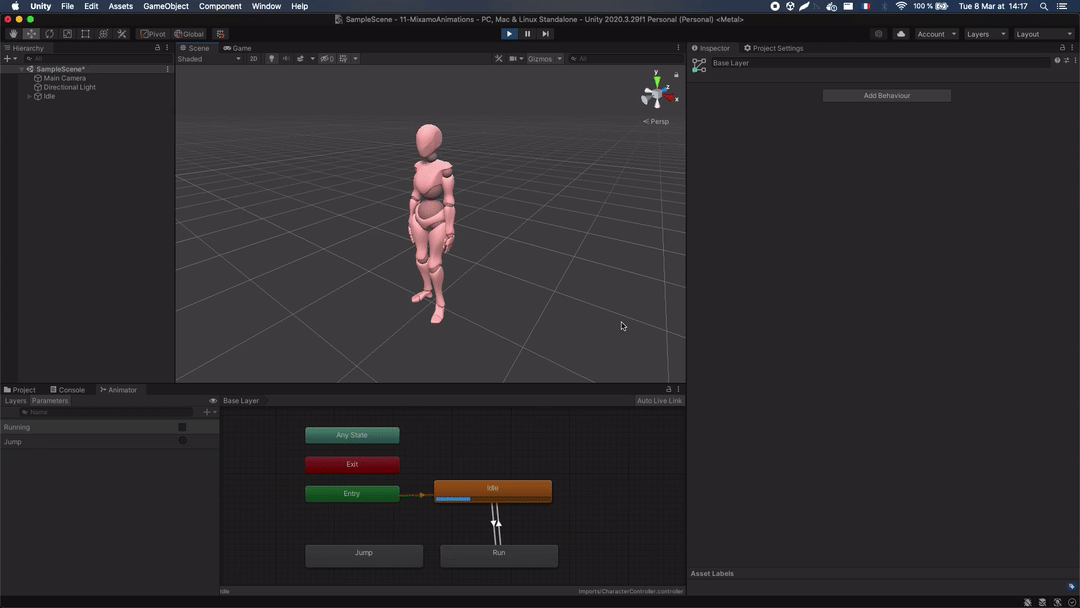
And then here, nosotros can see the state machine of how our basic model. For now, it'southward empty, considering we haven't added any animation to it:
Adding our "Idle" land every bit default
To add together states, or in other words animations, we simply have to open the Mixamo imported assets and click and drag the animation clip that are inside each to our Animator window.
Let's endeavor and add our "Idle" animation first. As soon as you drop information technology into the window, information technology gets added to the state machine and linked to the entry point. It is shown in orange, which means it volition be the default state.
So if you try and play your scene, you see that the X-Bot switches to this animation and plays it again and again (recollect nosotros prepare it to loop earlier!). If you want, you lot can even take this Animator window downwardly and examine the state machine while it runs. The blue progress bar indicates the state that is currently playing and we encounter information technology merely loops infinitely for now.

Adding the "Run" and "Bound" states
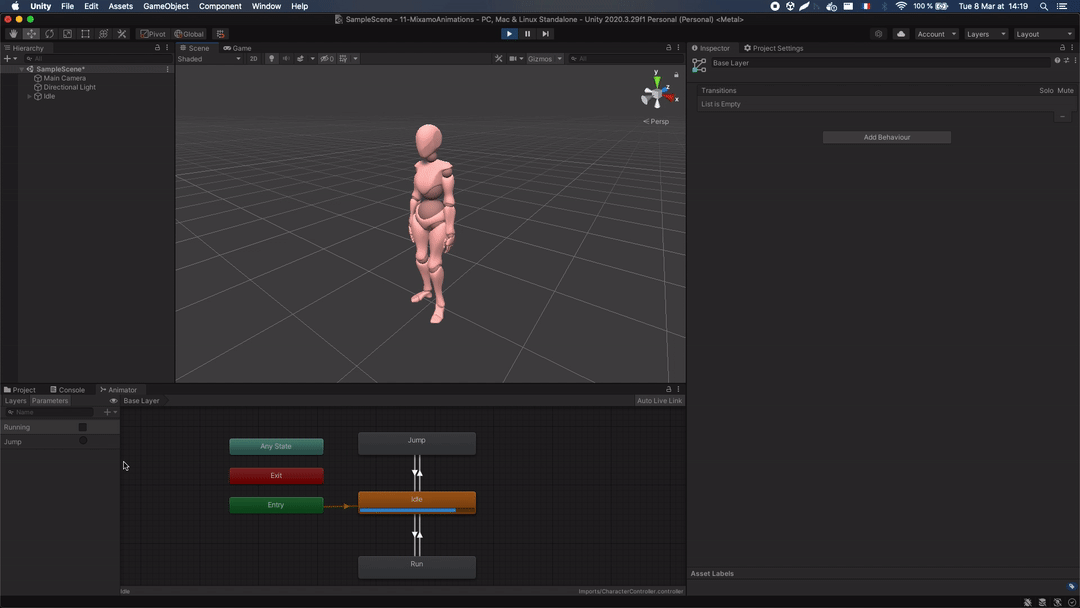
To add the other states, only open up the other avails and drag the animation clips to the Animator window. Y'all come across that this direct creates new blocks (i.east. new states in our state machine) with the associated animation.
Those states are shown in grey which means they are not default states.
Creating parameters, triggers and transitions
And then the side by side step is to create transitions between all of these states and then that our avatar can actually use the other animations – don't forget that, for now, information technology is stuck in its initial "Idle" state!
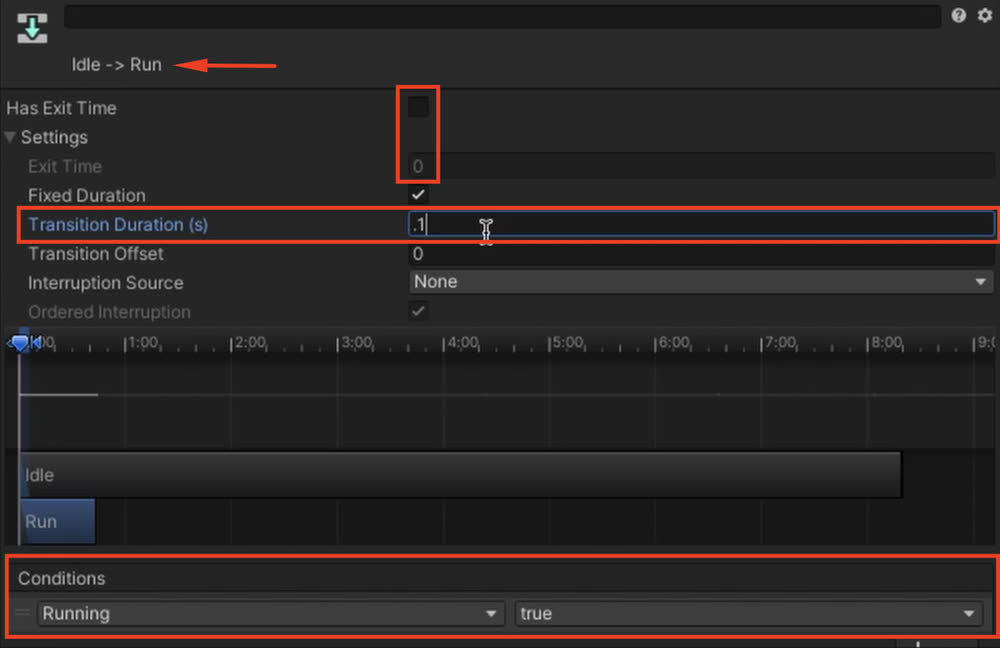
To create a transition, all you demand to do is right-click a block and then click on the target state. This will create an pointer between the two that you can select to farther configure the transition conditions and settings.
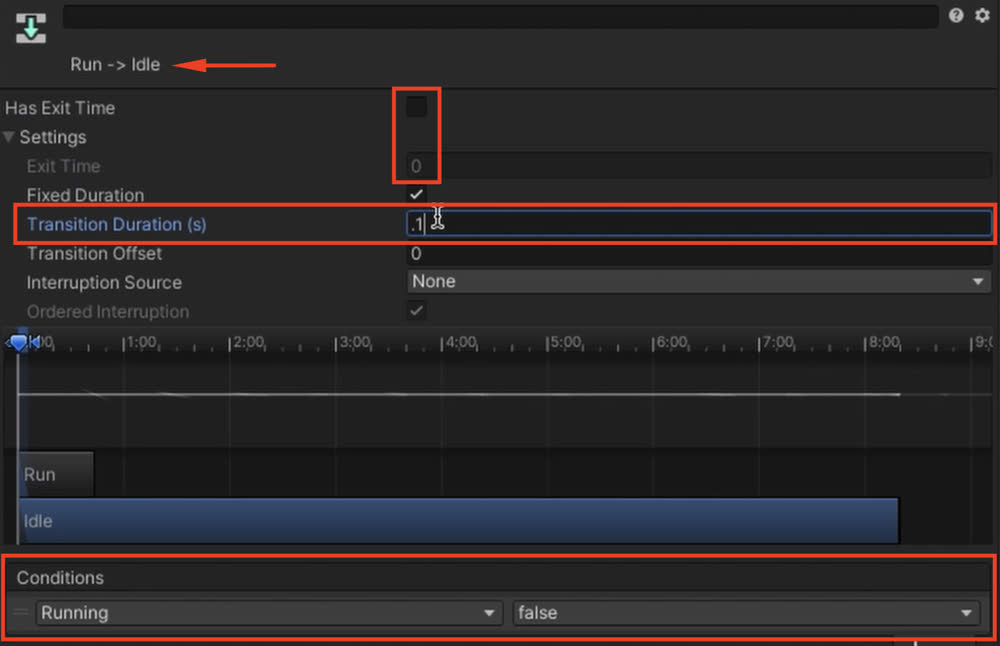
Starting time of, a really cool thing with Unity's Animator is that information technology can blend between the animations to make smoother transitions. This is controlled via the transition fourth dimension; by tweaking this value, you lot see that the animations overlap more or less and that you control the time it takes for the model to go from one pose to the other.
Then, the other important function of this panel is the atmospheric condition settings, at the bottom.
Transitions can be of two types: either conditional or unconditional.
An unconditional transition will only expect for a given time, that we call the "Exit Time", before switching to its target country. This is typically very useful when you desire some animation to play one time, and then as soon equally it's finished your land machine should transition to some other state.
A conditional transition, on the other manus, uses 1 or more than user-defined parameters or triggers to switch to the target state at specific moments. So rather than saying "look for 2 seconds", you tin can say "wait for this parameter to be true", or "await for this trigger to be activated".
And, of course, those parameters and triggers tin can exist accessed and fix via C# scripting, as nosotros'll come across very shortly! But these parameters and triggers needs to be created first, and this happens here, in the Animator window. On the left, you see that you have a "Parameters" tab where you can add new variables that are global to the country auto and that tin be of four types: floats, bools, ints or triggers.
In our example, nosotros want to create two parameters: one volition be a boolean called "Running" and the other a trigger called "Jump". You see that boolean parameters have a little bank check side by side to them, so yous tin can decide that your parameter is initially truthful if y'all want by setting its value here. Triggers simply take a niggling button you can click to call them.
Now, we want to utilise these variables in transitions!
Beginning let's end this transition between the "Idle" and "Run" states. Nosotros want it to happen when "Running" becomes true, and then we can add a condition on this parameter and bank check for the "true" value. Since we have a status, the Exit Fourth dimension is at present optional, and we should actually reset it to 0 and then that the transition starts as soon as the "Running" parameter is set to "true". We can go out a piddling bit of blend, with something like 0.1 second of transition time.
Of course, we also need to create the opposite transition: information technology's configured exactly the same except that we check for the "imitation" value for the "Running" parameter in our condition.
If we play the scene again, this time, we tin manually go and bank check the "Running" parameter to strength the transitions. Every bit soon every bit we click the checkbox, the transition occurs and the country changes. Our X-Bot is now running! If we uncheck the parameter and set up it back to simulated, we get our 2d transition and we go back to the "Idle" state.
For the spring state, we also want 2 transitions from and to the "Idle" state, merely this fourth dimension the outset ane will use our "Jump" trigger, so we don't need to bank check for whatsoever value, and the second transition volition be unconditional. Nosotros'll but wait for the jump blitheness to complete and go back to our "idle" state afterwards.
In one case again, we tin can enter play mode and click the "Leap" trigger to force the transition. Then, as shortly as we've waited the right amount of time, the state automobile automatically goes back to our "Idle" state.
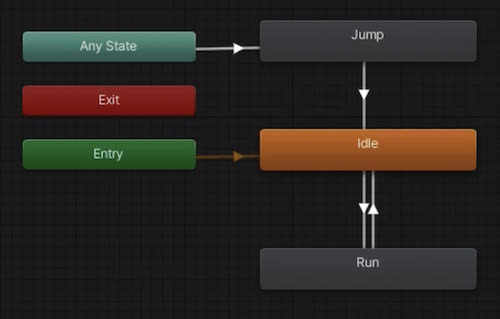
A nice trick is that we can easily allow the transition to the "Jump" state if nosotros are in the "Run" country, too, just by using the "Any State" block that's automatically created by Unity. This way, no thing which country we're currently in, if the "Jump" trigger is chosen then we'll go to the "bound" state.
However, we even so demand to transition back to a specific state, so I'll arbitrarily continue the "Idle" country.
Controlling our Animator from our C# scripts
We at present have a dainty and clean Animator Controller that works really well!
The simply affair is that we obviously don't desire to manually click the checkboxes and triggers – instead, we desire these parameters to be updated in our scripts along with the position of the character, depending on the player's inputs.
Important notation: in this tutorial, I will focus on handling keyboard inputs, but of course you can easily extend this to other kinds of inputs, especially yous're a fleck familiar with Unity'south new input system 😉
Anyway – to handle this logic, let'south create a C# script chosen PlayerController.cs , and put it on our avatar game object. And then, double-click the script to open it.
Preparing the script
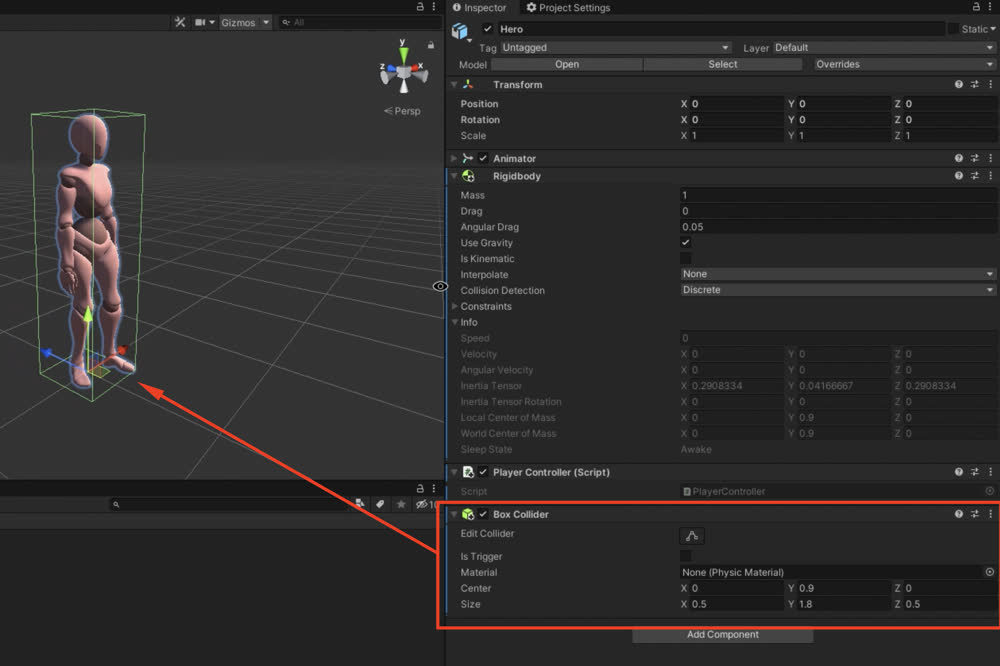
The commencement thing we need to exercise is create a reference to our Animator. This will allow united states of america to gear up the "Running" parameter and call the "Jump" trigger we only defined. Let's also create a reference to a Rigidbody, considering remember I want to use the basic physics system of Unity to handle my role player movements.
While I'one thousand at it, I'll tell Unity that both those components are required: this way, I'm sure that any game object with my PlayerController script also has an Animator and a Rigidbody.
If I go back to my Unity editor, I see that the missing Rigidbody was automatically added on my game object. I also need a BoxCollider, though, so that my object collides with the ground and doesn't but fall. Make sure that it is properly sized to match the avatar dimensions!
All of this ways that, in my First() function, I tin can use the GetComponent() built-in to fill both my references:
Now, since I'm using Unity physics, I'm going to use the FixedUpdate() update for my logic. Usually, it's meliorate to implement things in the FixedUpdate() when working with physics considering it gives yous deterministic and properly computed values:
Making our histrion run left and right
The first thing I'll code is my run feature. To do this, we'll need another individual variable, a picayune _running boolean flag that is initially false, and that will record whether I'thou already in the running state or non. I'll too need something to shop the current value of the horizontal input centrality. Since in this video, I just want my character to become left or right, I'll just look at this centrality.
Information technology'south defined past default in my projection settings, in the Input Manager tab, and assigned the arrow or the <a> and <d> keys:
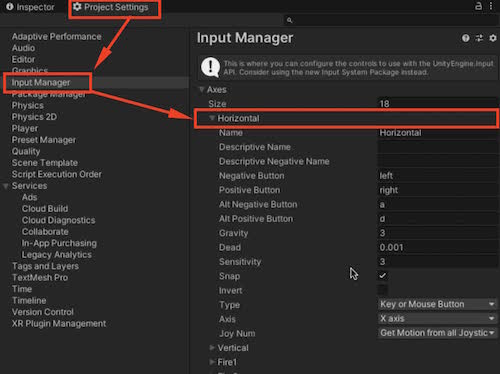
So, what I desire to do is become the current value of this input, which goes from 0 (if no key is pressed) to -i if the left cardinal is pressed, or to 1 if the correct cardinal is pressed.
If the value is non zippo, then I demand to toggle on the running. I won't bank check for an verbal zero friction match, though, because there can exist some approximation with floats so it's better to bank check with a small threshold, like this:
In that case, I have to movement my grapheme thanks to its Rigidbody, and optionally to transition to the "Run" blitheness state if my Animator is non already using it.
For the movement, because I'm in this "side-scroller" setting, I can simply set my rotation to look either left or right, and then move along my new frontward vector with a given speed.
This speed value is of course arbitrary and you tin can tweak it to your liking – I just notice that iii is dainty for my set!
Note: the minus signs appear considering of the axes of the imported model; y'all might need to adapt this depending on your 3D model, if it doesn't motion consistently with the inputs 😉
For the Animator, I want to check if I'm already running; in that case, I don't need to do anything. Else, I'll set my _running flag to true for adjacent time, and too set the "Running" parameter in my Animator component:
If I let go of the keys and the horizontal input goes back to 0, then if I was running I should reset to the "Idle" state; pregnant that I need to gear up my _running flag back to false, likewise as the parameter in the Animator:
All of these setters volition automatically call the right transition, like before when nosotros unchecked it manually.
If I run my scene, I can at present move left and correct: the position of my actor updates and information technology switches betwixt the "Idle" and "Run" states!
Adding the leap
The second feature is the jump and it's actually pretty like shooting fish in a barrel to add 🙂
Dorsum in our FixedUpdate(), at the very top, nosotros can check for our Rigidbody velocity. If information technology's somewhat cipher (once more, with a piffling threshold to be certain we don't have issues because of approximations), and if we're pressing the "Leap" input, then nosotros'll call our "Spring" trigger in the animator and add some strength to the Rigidbody:
The spring strength is another magic number, here I found that 6 was nice but it does take into business relationship the mass of my Rigidbody, because I'yard using the "impulse" force mode, and so if you determine to change the mass of your Rigidbody, yous'll accept to change this value to match!
A little improvement of the inputs
A concluding tweak we tin make is dorsum in our inputs definition, for the horizontal axis, we should put the gravity parameter to something way larger, like 1000. This mode, the input will be back to zero equally before long as nosotros release the key, rather than decreasing gradually over time.
Our final result
And here nosotros are! If we run the lilliputian scene once more, we can now run left and right, stand or jump from any of other two states 🙂
Of course, you might need to do some adjustments on the start and end frames of your animations, or on their speed. This can exist inverse by going either to the importer window, and setting the prune start and end frames, or past going to the matching state in your Animator and setting the speed value.
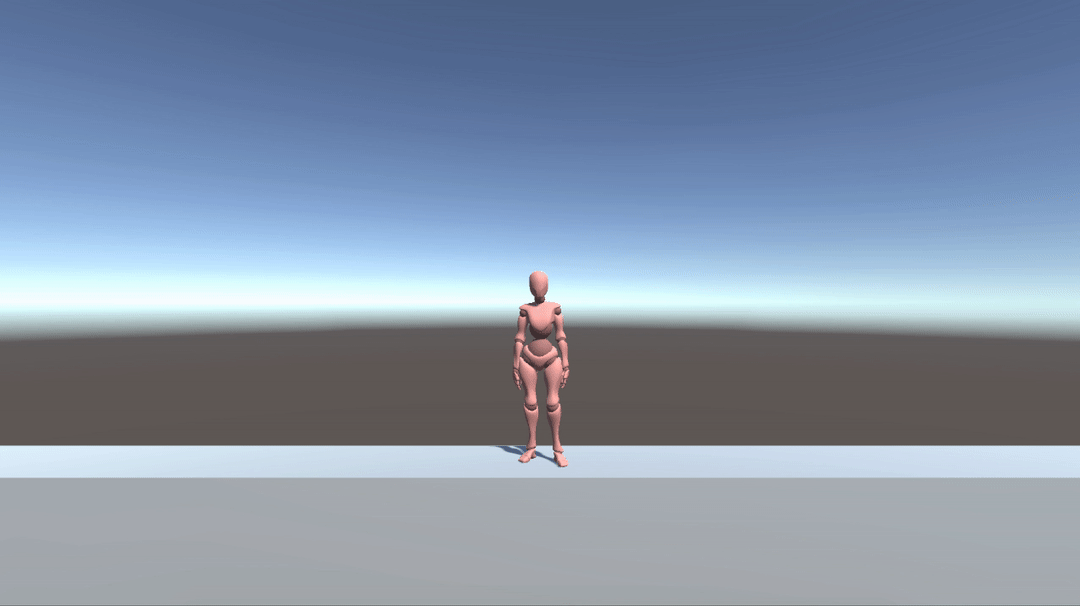
Here is finally a picayune demo of our player controller:
Decision
That's it for today, folks 🙂
In this tutorial, nosotros saw how we can use some complimentary resources from Adobe Mixamo to quickly ready a role player character in our Unity scene with some bones movements and animations. We then used Rigidbodies to movement around along an axis and to jump.
I hope you enjoyed this quick Unity tutorial and the dual video/text versions. Feel gratis to react in the comments and tell me if you like this format — and as usual, become ahead and share your ideas for future topics you'd like me to make Unity tutorials on!
Source: https://minapecheux.com/website/2022/03/09/how-to-animate-and-move-a-simple-player-with-mixamo-and-unity-c/
Posted by: whatleyephimagent.blogspot.com
0 Response to "How To Play A Animation From Click Unity"
Post a Comment